If you're looking to fix or replace your Heating or A/C system, we can connect you with a reliable and cost-effective professional in your area.
There are many positive aspects related to the tankless water heaters, and the low risk for corrosion is definitely one to name. As there is no tank for collecting the water, tankless water heaters present a lower risk for corrosion. They’re more durable than the traditional systems with tanks and more comfortable to take care of altogether.
Despite the lower risk for corrosion, water may still lead to mineral buildup in time. The buildup can eventually erode the walls inside the heating chamber of the tankless water heater. In order to take good care of your tankless water heater, you should clean and eliminate the mineral deposits any now and then. Once a year should be enough, but it depends on the hardness of the water in your area and the Rinnai tankless water heater that you’re using.
What’s the proper way to clean a Rinnai tankless water heater?
Even if tankless water heaters are rather easy to maintain, when it comes to cleaning, it’s advised that you follow the steps precisely. We’re still talking about a device, so no shortcomings are allowed throughout the cleaning process.
Here are the steps to take when cleaning your Rinnai unit:
1. You always begin with turning off the power source for the Rinnai tankless water heater
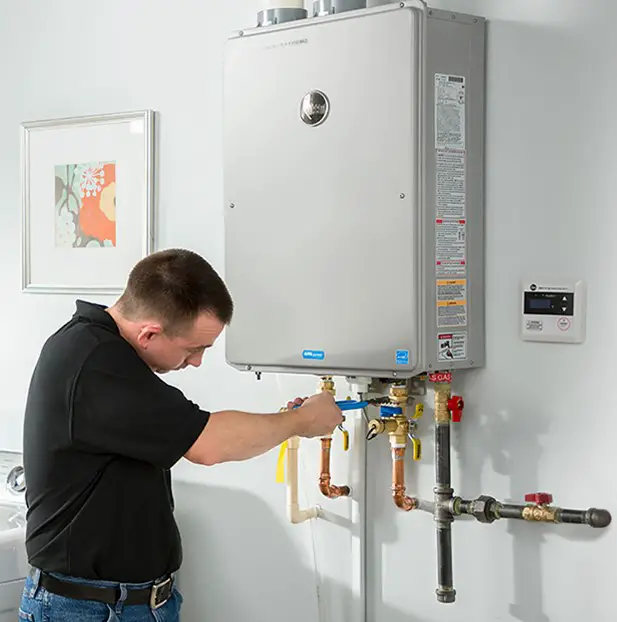
If you have an electrical model, you need to turn off the circuit breaker. Should you use a gas-fired unit, you simply shut off the main gas.
2. Turn off the water valves
We talk about the three water valves that are connected to your Rinnai unit. You don’t want the cold water to go into the water heater while you’re cleaning. In addition, you don’t want the hot water to come out either.
There are three water valves: one for cold water (typically it’s blue), one for hot water (it should be red), and the last one is the main valve running the water into the household.
3. Address the purge port valve caps
Take a look at the purge valves that should have tiny handles, reminding of the letter “T.” You have to take the caps away really slowly from the purge valves for releasing the pressure build inside the pipes. The step will also lower the risk for hot water to come out suddenly while cleaning. Expect some pressure as you’re taking the purge port valve caps away. Once again, the hot water valve must be entirely turned off (for the obvious reasons!).
Manage as careful as you can the caps so that you don’t move the rubber sealing discs. They’re essential for the valves to work correctly.
4. Connect the hosing line to every valve
Not all manufacturers include the hosing lines with the unit, but they’re easy to find in shops for home repairs and water heaters. You need the hosing lines to reach between a bucket and the water heater.
Go over the user manual or even contact the manufacturer directly for learning the instruction for flushing.
At times, a sump pump will help connect the hoses to discharge. You may very well flush the water from both the cold and hot water valves.
Don’t forget to open the purge port valves. It’s an easy step, and you only have to twist them perpendicular to the cold/hot valves’ position.
5. Clean the Rinnai tankless water heater
You can only use chemical solutions of the water heater doesn’t heat water for drinking. However, you should use undiluted white vinegar for cleaning the water heater. Four gallons of water should be enough. Never use chemical solutions since they are dangerous for your health.
6. Check the user manual
For the flushing and draining procedure, you should go to the user manual once more. Rinnai tankless water heaters differ, so they may have different requirements when it comes to flushing and cleaning.
Typically, the cleaning shouldn’t last more than 45 minutes.
7. Close the purge port valves
When the flushing is over, you need to twist the handles for closing the purge port valves. Remember that you also have to disconnect and put every hosing line away from the valves. Also, put the purge port valve caps back onto the pipes.
You must tighten the caps firmly, without over-tightening them. You don’t want to damage the rubber sealing discs inside the caps, though.
8. Re-start the unit
You have to check the manufacturer’s manual once more to see the precise instructions on what’s the proper way to re-start the tankless water heater.
More often than not, you may only have to rotate and open the cold and hot water valves. They should be parallel to the main valve’s position.
9. Complete the cleaning process
Select a sink tap inside your home, turning on the hot water gently. You want to let the air go through the pipe. Let it run until it regularly runs with no air escaping anymore. A gentle sputtering sound is a sign that everything is fine now. It’s going to take a couple of minutes until all of the air pockets will escape.
We can definitely connect you with a trusted provider in your area to repair, replace or maintain your heating and A/C systems. Why not let us find a professional for you?


