If you're looking to fix or replace your Heating or A/C system, we can connect you with a reliable and cost-effective professional in your area.
When it comes to heaters, no matter if they’re tankless or traditional systems with tanks, it’s only a matter of time until the built scale deposits will develop and alter the efficiency of your water heater. Even if the risk for corrosion is lower in the case of tankless water heaters, it’s almost never null.
The rate of scale build-up depends a lot on the water hardness in your region. However, you can never avoid flushing a tankless water heater, Noritz, included.
Page Table of Contents
How to describe flushing in a nutshell?
Not only that, Noritz developed reliable and durable tankless water heaters, but it also created an effortless descaling procedure. For many experienced and skilled homeowners, following the steps of flushing, a tankless water heater should run smooth. Nevertheless, it’s safer to get a professional plumber so that you don’t void the warranty.
One tip before you actually start the flushing
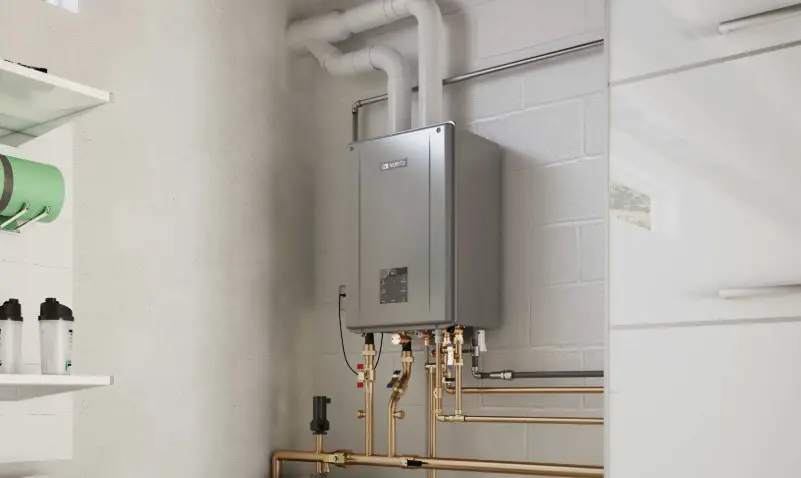
There are a couple of things you need to know about your Noritz tankless water heater. Understanding the components is going to ease out the descaling process:
- The red isolator valve represents the hot water side
- The blue isolator valve is for the cold waterside
- The drain caps are placed on top of the hot side, and the left of the cold front
- When you turn the pipes to the vertical position, it means that they’re on, whereas the water is flowing freely
- The valves are “off” when you turn them to the perpendicular position
What do you need to prepare for flushing?
It’s better that you have all the things ready for the flushing process:
- 4 gallons of white vinegar
- A 5gallons bucket
- 6HP submersible utility pump
- A pack of two stainless steel hoses. Some like to use the rubber hoses, but stainless steel models are longer lasting and stronger too
- A soapy water solution for cleaning the hoses. Even though you shouldn’t drink the hot water served by the water heater, some people like to go the extra mile and get everything clean with the soapy solution. Even everything is new, some residue from fabrication may still be left on the hoses, for instance.
Which steps do you need to take when flushing your Noritz tankless water heater?
For best performance and more extended durability, you should flush your Noritz tankless water heater once a year.
Here’s how to do it right:
1. Begin with turning the gas valve off, while the unit is still on
2. Continue with turning the cold and hot valves off. Take the drain caps on both pipes and put them away.
3. Put the five-gallon bucket right under the hot water side
4. Turn the red drain valve smoothly to the “on” position. You can use the bucket for draining the unit of excess water left in the system
5. Do the same thing for the cold waterside
6. Make the connection between the hose and the submersible pump, putting it with the connected hose into your bucket. You need to be sure that the power cord remains out of the bucket
7. It’s time to make the connection between the cold water drain valve and the pump outlet hose
8. You also need to drain hose to the hot water drain valve, putting the end of the drain hose straight into the bucket
9. Pour 4 gallons of vinegar into your bucket, making sure that the pump is submerged entirely. It’s also important that you open the drain valve lever handles on the isolation valves. Let the pump run for an hour or so.
For the best results, you should change the vinegar solution after half an hour and repeat the flushing. Even if the unit is going to try to fire up, it’s not going to happen since the gas is off. You should also expect an error code (11), but it’s normal while flushing. Don’t reset the unit despite the error code.
10. Turn the pump off (minimum an hour), closing the cold water drain valve. Remove the hose from the cold water drain valve, and put the cap onto the drain valve outlet.
11. You also have to take the drain hose and the pump away from the bucket, draining the liquid. Place the hot water drain hose back in your empty bucket, and open the cold water main valve. This way, you will flush out the heater with fresh and cold water. Let the flushing go for five minutes. You can leave it so until 20 gallons of water ran through the water heater.
Side note: Should you have a condensing unit, it’s better that you put the bucket right under the water heater, twisting open the drain cock. It’s placed under the water heater, for draining out the descaling medium that has built up in the unit. Don’t forget that you have to turn the main inlet valve to the “off” place.
12. Some maintenance may be necessary. Therefore, you should unscrew and take the water filter out for some cleaning. You can use some water to flow it out. Place the filter under running water for getting rid of all debris. Place the dry filter back into its port. Tighten it carefully by hand.
13. Have the drain valve to the “off” position. It’s time to unscrew and remove the drain hose as well. Remember to replace the drain cap, so that it’s screwed on really tight.
14. Finish the flushing with turning the primary cold and hot water valves back to the “on” position. Don’t forget to turn the gas supply back on.
As for the error code 11, which descaling may cause, you should reset the water heater by simply powering it off. You can power it on again in the end.
We can definitely connect you with a trusted provider in your area to repair, replace or maintain your heating and A/C systems. Why not let us find a professional for you?


