As a homeowner with a lovely little garden to enjoy, you must already know that regular maintenance is necessary. Drainage problems are relatively common and installing a french drain is an excellent solution. If you’re a family handyman, you can solve the drainage problem with a french drain. It’s not the most complicated DIY job, especially if you know your way around plumbing and gardening.
Drainage experts recommend the traditional french drain for collecting water from heavy rain. Get the best out of your recreation areas outside, get rid of the standing water, and install a french drain- it’s one of the most appealing solutions to have in your garden!
Page Table of Contents
What is the French drain?
Regardless of many people, the French drain doesn’t come from France. It was actually Henry Flagg French who invented the drain in New England in the 19th century. He wrote a book about drainage systems and suggested a cellar drain that we all know today as the French drain.
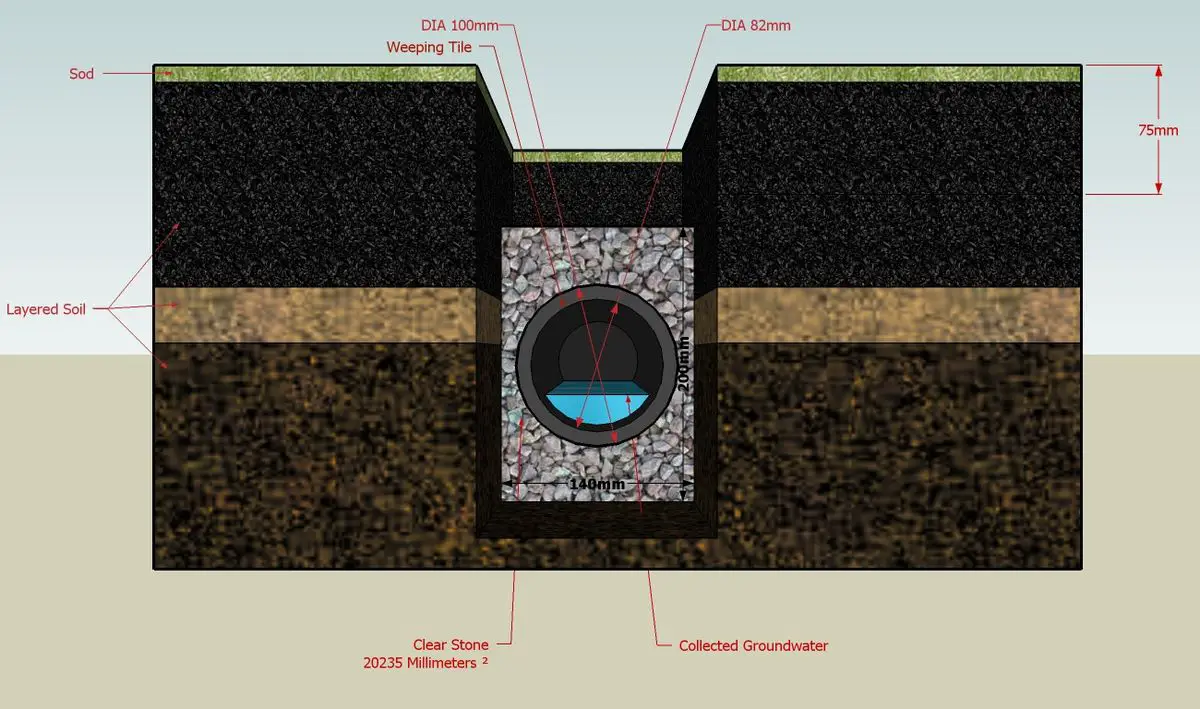
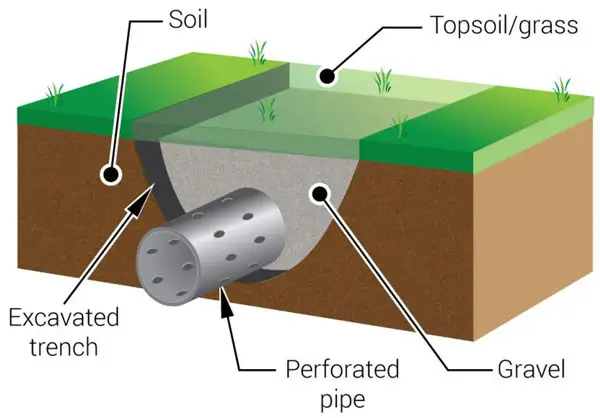
The French drain includes an excavated trench with gravel sides and a perforated drain pipe to divert water away from the house. Water will run down the gravel and fill the pipe, where it’s collected and carried away.
What’s the mechanism behind the French drain system?
The French drain will collect water and groundwater and direct them into an adequate outlet through gravity. A low-lying area or a drainage basin in another area of your property are such areas. As the water level in the trench increases, water gets in the drainpipe and be taken away. As long as it has the correct angle (down), the pipe will take surface water from the problematic area to adequate space.
The gravel-filled trench will be covered, so you will still use the surrounding soil. You won’t notice any unsightly drains or open ditches and you should install a french drain for a yard/area where aesthetics are crucial. The french drain systems are entirely buried and won’t alter the looks of your garden in any way.
Do you need a French drain?
French drains are highly versatile and they work in many drainage situations, such as:
- when water may damage the retaining wall during or after heavy rains. Areas with clay soil will hold water, so look for them when finding the best location for the french drain.
- in places where an open ditch isn’t safe nor practical
- when water pools in an area that you want to keep dry (a garden or play area)
- when you have to divert surface water away from your house’s foundation
- if water flows toward a low-lying building such as a shed or barn
Are there codes and regulations to follow?
Yard drainage projects, including French drains, are restricted by local building codes, community rules, or zoning laws. It would be best to always go over the local building and zoning authority to confirm your plans. If applicable, you need to go to the homeowners association as well. It might be forbidden to direct surface water from your property into stormwater systems in some situations.
If your drench drain installation isn’t approved, you can look into alternatives. A dry well will keep the drainage water on your property so that the ground absorbs it; the water won’t flow over the surface.
What factors to consider for the French Drain design?
We advise you to look into french drains before buying your supplies. For example, the slope is crucial as you need downhill to have the water running the entire length to its destination. The drain must run from the highest to the lowest point for the most efficiency. Once you determine the location, mark it with spray paint or flags.
For this sort of drainage system, you need specific angles for specific types of pipes. For example, the proper slope is at least 2% for the corrugated pipe. Typically, the french drain installation requires a drop of at least 1% in depth for every 100 ft of length.
Here are the factors to consider before installing a french drain:
French drain aggregate
The gravel you use ranges from pea gravel to large pieces of river rock. If you plan to use an aggregate of various sizes, you should place the smaller pieces close to the pipe and large amounts close to and on the surface.
French drain depth
Eight inches to 2 feet deep is typically enough for drainage systems, including French drains. If the system is around foundations, sub-ground living space, and bases of retaining walls, you will need deeper installation. With water in the basement, you will need a sump pump to push the water through the drain system.
French drain flow
The slope is crucial for the system to carry water away from the house. The aggregate placement and surrounding landscaping fabric will reduce the risk of debris clogging the pipe.
Is installing a french drain a DIY project?
You can solve the drainage issues with a french drain, but we don’t recommend you embark on the project if you lack the skills, supplies, and knowledge. Even if the french drain is the right solution for your property, you should be aware of the amount of labor you will need to do. You will have to dig at regular intervals– rent a trencher to work faster and easier. You will need to fill the trench with gravel which requires time and some elbow grease. Ideally, you want a truck next to the trench to dump the gravel.
The size of the drain and the materials you will use will impact the final cost for your french drain. You can find systems wrapped with Poly-rock, so you no longer need gravel. Here’s what you will need to install a french drain:
- shove/square garden spade
- drain pipe
- ditch digger (you can also rent it)
- inlet grate
- outlet grate
- spray paint/marking flags
- drill
- gravel or french drain pipe with substitute
We want to highlight that you will spend the most on the gravel, primarily if it’s delivered from a fairway location.
How to install a french drain–here are the steps to follow!
Don’t hurry up and start digging just yet. With plumbing issues, you need to pay attention to most minute details.
Do the planning and preparation
You still need to have to check out for underground utility lines. The last thing you want is to hit an underground line– the repairs will be expensive and, more importantly, it’s dangerous and even deadly!
You can call 811 to check where the underground utility lines are marked. Your local utility company will send a technician to identify the lines. You always want to have the underground utility lines marked for safe french drain installation.
Ensure that the drainage route runs at least 39in/3ft from any fencing or walls. Avoid shrubs, posts, and tree roots. Mind the source of the water and the highest expected amount of flow. Don’t forget to see if it’s a contaminated or hazardous source.
Examine the zoning and runoff problems. Some municipalities have regulations on building/digging on your property. Make an appointment with city/county officials to make sure that you can have your french drain, to begin with. It’s not a pleasant thought to know that you need to run through government channels when working on your property, but it’s in your best interest.
To have the “green light” for your project, you might need to stay in touch with the board of officials or local government. Sometimes, even moving a small amount of ground requires tricky sign-offs by local government groups. It’s your responsibility to learn about the covenants and regulations in your neighborhood about installing a footing drain.
Ideally, the excess water runoff should go in a less used area of your garden, away from the house, into loose soil so that water passes through easily and quickly.
Identify a downhill slope
Sandy soil in a less-used area is an excellent choice, but you need to consider your property’s specific features when picking the location of the drain.
You cannot have the French drain at ground level; it has to be built on a slight downhill grade. This way, you will divert water away from the problematic area thanks to gravity. Keep in mind that you don’t want water to get to someone else’s land either.
If your property doesn’t have a natural downward slope, you need to make one by digging deeper as you work along the bottom trench. A 1% grade for the French drain is enough for most projects. Leave a drop of one foot for every 100 feet of drainage– it’s around one inch for every ten feet of run.
You can mark out the patch of your trench line with some landscaping paint. Use a length of string, several stakes, and a string level to measure the incline from the trench’s end to another. We recommend you hire a professional or a surveyor if you cannot determine the proper pitch for the curtain drain. They can help decide the dimensions and best location for your french drain.
You can rent a transit level if you know how to use it. Keep in mind that you don’t need perfect ditch depth and grade. However, you don’t want to have uneven trench bottom or areas where the water reaches the least resistance and ends up pooling.
Make sure you have all tools and materials
Several basic materials and tools are necessary when installing a french drain:
A perforated plastic drain
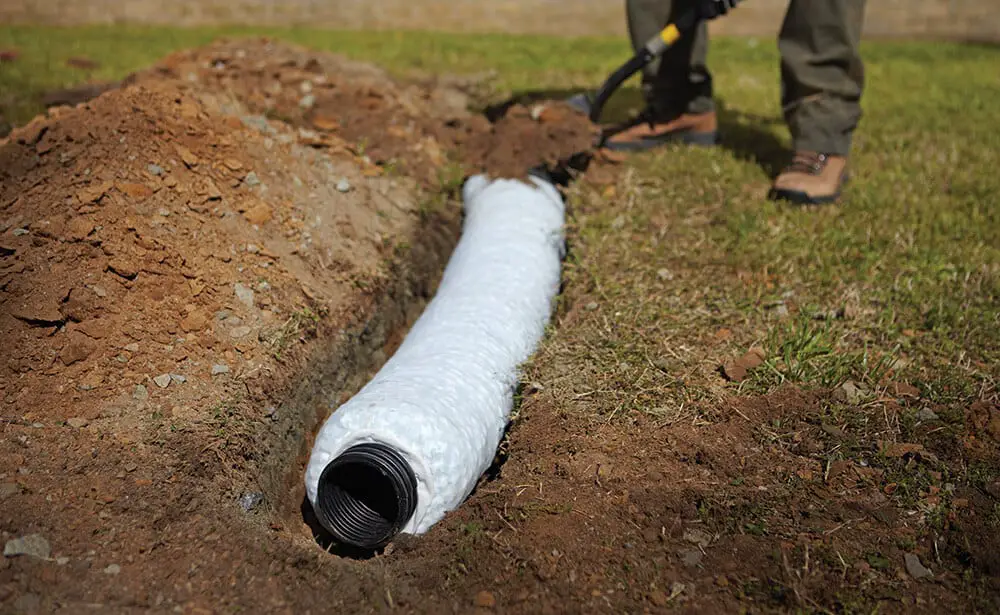
The drain’s diameter depends on the complexity of the drainage issue and the trench’s size. You can install a flexible drain pipe or a PVC pipe. The most common pipe materials are plastic and PVC. The PVC pipe is more rigid and easier to unclog. See that the pipe can divert all the flow collected along the run.
Water-permeable landscape fabric
You need a roll of landscape fabric to maintain the drain pipe clean and reduce the risk of clogging. The fabric will stop roots, silt, and soil from getting inside the drain. You can add an ADS perforated pipe with a fabric sock.
Drainage Gravel (washed)
The drain size is crucial for the number of bags you need. You can find an online gravel calculator to estimate according to the depth and with of the planned trench. Needless to say, some projects will require more bags than others. Don’t forget to ask about the delivery fees for large amounts of gravel/rock.
Tools
As we’ve mentioned, you will need a digging hoe or a spade to dig the trench manually. Renting a trenching tool or hiring a backhoe operator are other options. See that the backhoe can cut the trench as deep and wide as you need for the pipe. Most walk-behind trenches cut 4 to 6-inch wide trench.
Build the Drain
The French drain is the best solution when you want the drainage system to completely cover any pipes. However, you need to pay attention to every step you make when building the drain:
Dig the trench
Regardless of what some may say, digging the trench is less complicated than you think. However, it’s energy-consuming! We recommend you get some help from a family member, a friend, or a neighbor to dig the trench.
The complexity of the drainage issue is crucial when deciding the width and depth of the drain. The tool you will use for digging is also essential. Most french drains are six inches wide and 18 to 24 inches deep. With severe drainage issues, a larger trench will be necessary and you can use a trenching machine to do it. These tools will ease your efforts and cut down the digging time in half. Keep in mind that using a trenching tool adds to the spending as you need to rent the tool and buy additional gravel to fill a large trench.
Be aware that trenching machines are challenging to operate and quite dangerous. When you don’t know how to handle it, hiring professionals or using a hoe is best. Should you be determined to use the trenching machine, make sure that nobody gets close, under any circumstances, close to the chain while operating the machine.
It’s the same for cutting the trench with a backhoe, which cuts wide and deep trenches. You will need to pay the extra box for renting and having someone operate the machine. Keep in mind to examine the depth of the trench from time to time so that the machine is consistently sloping downwards.
Install the grate
You need to install the inlet grate at the trench’s beginning to collect additional water. Attach the grate to the first pipe length and place the pipe into the trench. If you use a non-perforated pipe, drill 1/4-in drainage holes every six inches. The holes have to face downward.
Use landscape fabric to line the trench
Once you’re done digging the trench, you need to place water-permeable landscape fabric to line it. Leave 10 inches of excess fabric on all sides of the trench. You will be able to trim it later as the other gravel/ rock you will put inside the trench will pull the fabric down. Be generous as you need enough fabric on the sides to fold over the drain rock. This way, it won’t contaminate and plug the pipe. You can use nails or pins to pin the excess fabric.
Add the gravel
Shovel 2 or 3 inches of gravel along the bottom of the trench, on top of the landscaping fabric.
The pipe needs to be covered and you can shove gravel over it. Do it until you have 3 to 5 inches between the gravel and the top of the trench. Use the excess filter fabric to fold it over the gravel. You will stop the debris from getting inside the drain but allow water to go through.
Fill in the trench
Use the displaced soil to fill the trench. Now you can get creative with the finish of the trench. Here are some suggestions:
- you may create a slight curve to the drainpipe to resemble an intentional design feature.
- You may lay sod on top, reseed with grass and even place massive stones for decorative purposes.
Test out your french drain
We recommend you give the french drain a test. Use the garden hose to see if the drain flows correctly. Test the french drain after you set up the filter fabric to ensure that you have the proper slope for the drain.


