
Water spigots are some outdoor facilities exposed to the elements and extreme temperatures. A leaky outdoor faucet isn’t the end of the world and replacing the outdoor faucet isn’t the most challenging plumbing task.
If you’re determined to replace an outdoor spigot on your own, you can save some money from not hiring the plumber. You want to get a water tight seal when you’re done and not damage your plumbing system either.
Page Table of Contents
What do you need to know about your outdoor faucets?
The spigot lets you connect a water feature or hose to your house’s water supply without running a line from a tap/sink to the main water pipe. Since the exposure to the elements and extreme temperatures is constant for the spigots, it’s only a matter of time until they start to leak, corrode or become permanently damaged. Replacing the outdoor water faucet, whether it’s damaged, corroded, or leaking, will eliminate damage to the surrounding wall.
You might get confused with the terms such as sillcock, spigot, and hose bib. Each of these terms refers to a type of outdoor faucet (hose bibb).
The main types of outdoor faucets
The main types of outdoor faucets are as follow:
Spigot
Professionals in the plumbing industry use the term “spigot” when discussing the outdoor faucet.
Hose bib
The faucet where the spout comes with threads where connect the hose is known as the hose bib.
Sillcock
The sillcock is an outdoor faucet with a long pipe where the mechanism stopping the water is at the water pipe’s end. This way, it reduces the risk of frosting.
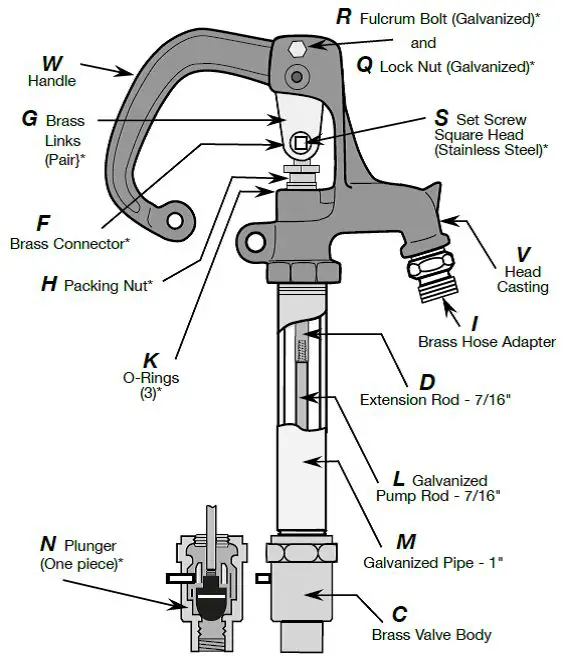
What are the parts of the outdoor spigots?
It will be easier for you to repair or replace a hose bibb if you know what it is consists of:
- handle- you use it to turn the water on/off
- threads- you can notice than at the spout’s tip to conned the outdoor faucet and hose
- rubber washer- it’s a rubber that seals water when you turn it off
- valve seat-you can use it as the gate stopping the water when the hose bib is off
- bonnet packing- the rubber inside the bonnet nut that seals the water at the faucet base’s top.
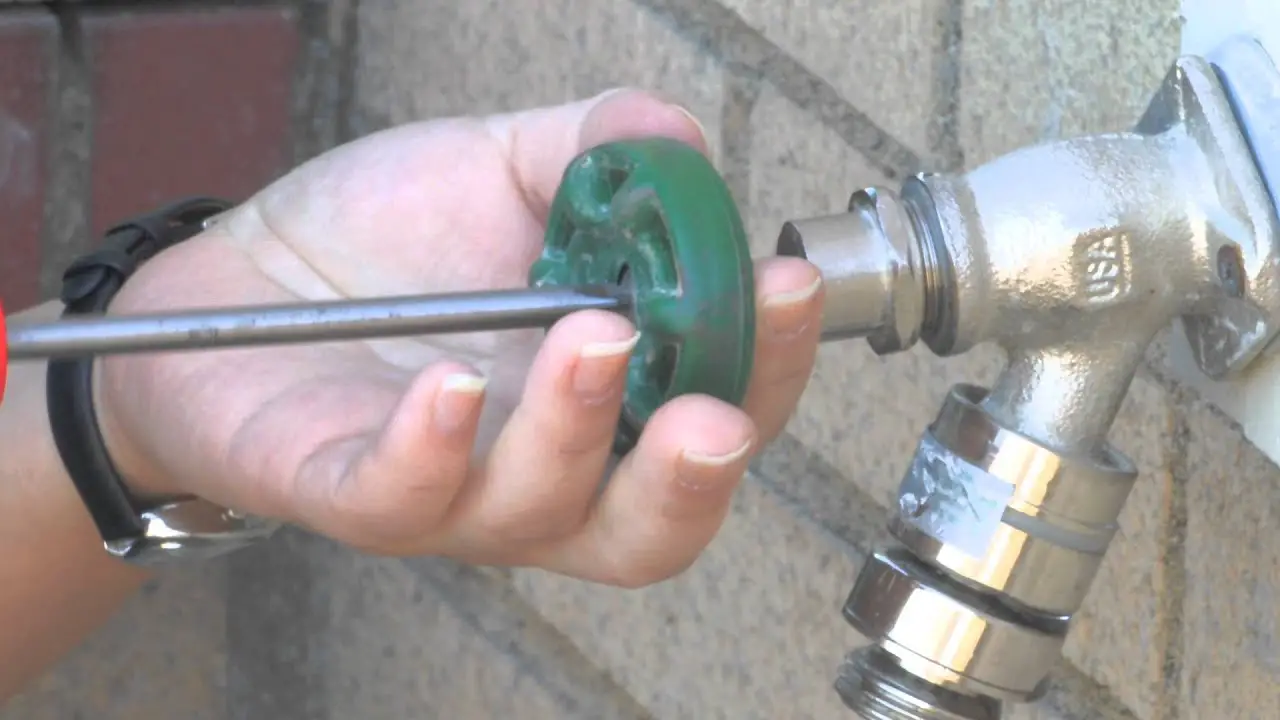
A worn-out washer is a common cause of a leaky spigot and it’s not able to seal the water at the valve seat. Remove the screw at the handle’s top to remove the washer or the other components of the hose bib. We recommend taking the worn-our washer to the hardware store to pick the correct size and type.
The washer and the bonnet packing wear down in time and cause leaks. Use one pipe wrench to tighten the packing nut and eliminate the space between the nut and the packing to eliminate water leaks. If not, consider replacing the shut-off valve of the hose bibb and even install a new spigot.
Do you need to replace an outdoor faucet?
Try to repair the outdoor faucet first. Here’s when your outdoor faucet requires replacement:
- it would be best to replace an outdoor faucet when adjusting and/or replacing the components don’t result. You must remove corrosion and rust as they damage most outdoor faucets (also known as hose bibbs).
- Broken threads in the spigots cause leaks and high water bills every month. If not managed, mould and rust will build up and permanently damage the hose bib.
- Mineral deposits will build up in the water spigot signal because you have hard water running in your pipes. The mineral deposits will clog the inner mechanisms of the faucet and damage it.
How to replace a leaky outdoor faucet?
It will be less complicated to replace an old outdoor faucet when you know something about its components. As with any repair, you should gather the tools and materials you need for the replacement job.
Tools you need to replace a spigot
Here are the tools and materials needed when replacing an outdoor faucet:
- plumbing tape/Teflon tape– to make a watertight seal for the threads to the existing water pipe
- two pipe wrenches- you need one wrench to hold the water pipe and the other to remove the old spigot from the old pipe
- new spigot- get the adequate size and type of hose bib as a replacement. You don’t want future leaks.
- curb key- to close/open the water meter
- small steel brush or an old toothbrush- to remove debris and rust from the faucet and the pipe
- spray lubricant- to loosen the rusty and tight threads.
How to install the new spigot
Here’s how to do it:
- turn off the water supply through the valve/water meter
Find the valve connecting the spigot to the main water pipe and turn it off. When you don’t see any valve connected close to the spigot, use the curb key to turn the water off from the water meter. Typically, the water meter is located in an enclosed case in the crawlspace or the basement.
- drain the remaining water by opening the outdoor faucet
Even if you close the supply, some water may still be in the pipes. Open the spigot to drain the left water in the pipe. This way, you will reduce the water pressure remaining in the water pipes and safely continue.
- use the pipe wrenches to remove the old spigot
Hold the water pipe with a wrench and connect the other wrench to the spigot’s base. Use your dominant hand for effortless work. Carefully loosen the faucet in a counterclockwise direction. Remove the spigot by hand after you loosen it enough.
- clean the threads and the end of the pipe
r=Remove dust and other debris between the threads and the pipe’s tip with a brush. If the house is old, so is the plumbing system, so you shouldn’t force brushing. You will most likely break the parts if you use too much pressure. If the spigots are corroded or rusted, we recommend you use a spray lubricant (penetrating oil) to loosen and dissolve the threads and remove corrosion.
While you’re cleaning the spigot, you might notice mineral deposits looking like a powdery substance in the pipes. The hard water running in your pipes is the main cause of the mineral deposits. You should also manage the whole hard water problem (install a softener, for instance) and remove the residues. You will avoid many plumbing problems this way.
- cover the threads of the spigot with Teflon tape
The Teflon tape is excellent at keeping the faucet and the water line together. It also reduces the risk of water seeping through the threads. Seek that you cover every spigot thread with the Teflon/plumber’s tape.
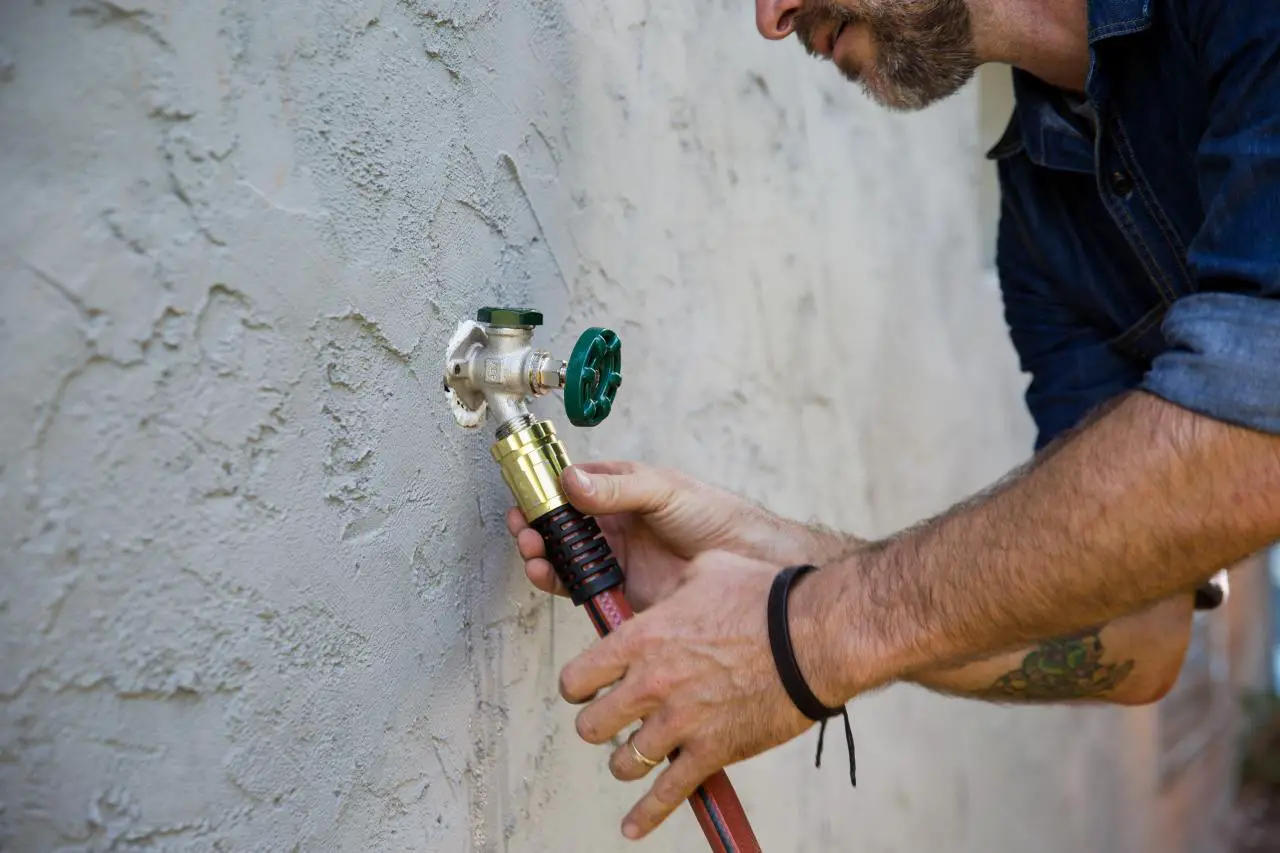
- connect the new spigot to the pipe
Use your hand to pull and rotate the new spigot. Put one wrench on the pipe and the other on the spigot’s base. Be gentle when tightening the spigot. Don’t forget to twist the faucet so that the threads don’t become stuck. There should be no room for leakage either.
- open the water supply and look for leaks
You have to check your work, so turn on the water supply. Are there any leaks? If the water flow doesn’t stop, you have to turn off the supply and install once again the new spigot.
Here are some helpful tips to use when replacing an old spigot
Even if replacing an old spigot isn’t the most challenging plumbing task, you should still consider the professionals’ recommendations. It only takes a small mistake to end up with a severe problem that requires professional assistance. Bursting pipes and floods happen a lot due to improper repair work.
Check out the type and size of the thread of the current outdoor faucet
The size of the spigot depends on the size of the existing pipe. The typical pipe size in the US ranges between 1/2 and 3/4. There are female and male threads.
Female threads are placed on the inside surface of the waterline. The male threads are exposed to the exterior layer of the pipe. Most spigots come with male threads, so check out yours before buying. You can also take pictures of it or take them with you to the hardware store. It’s the best way to find the perfect size and type for the replacing water spigot.
When placed on the exterior wall, use a drill
To reduce the risk of breaking the pipe, you need to drill the screw holes horizontally. After you access the pipe and replace the spigot, cover the hole in the wall with cement. Use a wet sponge after filling the hole for a perfectly smooth finish.
Avoid using too much force when twisting the spigot
It’s not easy to detach the faucet from the pipes if it’s rusted and corroded. If you use too much pressure, you can break the threads or the water pipe. The risk is even higher with old lines and you can cause severe damage to the plumbing system if so. Use a pipe wrench to grasp the supply pipe at the hex nut. Use a second pipe wrench to turn the faucet counterclockwise.
When it comes to using a pipe wrench or twisting a water spigot, too much pressure can be damaging. We recommend you use a spray lubricant through the threads. Let it seep through to dissolve the rust before using the pipe wrench.
Protect the water pipes and use a low water pressure
If you need to turn off the water supply right from the water meter, seek that you don’t raise the water pressure when you turn it back on. High pressure in the water supply can burst the pipes and even break them.
You should maintain the pressure lower than 80psi so that the plumbing system remains safe. You can also take a picture of the meter before turning it off. It’s the best way to know the correct pressure to have when turning it on.
Remove the garden hose before winter comes
There are many causes for water pipes t burst, and frost is one of them. During the winter season, plumbing work is expensive for this sole reason. Avoid all the fuss and spend for repairs by simply detaching the hose from the outdoor faucet. You should also add insulation to reduce the risk of freezing. Details about protecting the current outdoor faucets (hose bibbs) in the winter come below.
Have you considered installing a frost-proof faucet?
With so many things on our minds, it’s understandable why we forget to protect every outdoor faucet before winter kicks in. The easiest and surest way to get rid of all the worries about frozen and bursting pipes in the winter is to replace the current spigots with frost-proof faucets, respectively sill-cock. You can control these faucets with a long rod that goes inside the house, where a compression valve and a cartridge controls the water flow. As the valve is located inside the house, where it’s warm and cosy, the risk for the faucet to freeze is null.
What is the frost-proof faucet?
The frost-proof faucet is a 6-to-20 inch unit with a hose spigot with a connector at one end (to attach to the indoor water pipe) and a control handle at the other end. Such a faucet is self-draining, so when you shut off the faucet handle, the excess water in the long stem will drain out.
You can use compression, soldering, push-fit connection or PEX to attach a frost-proof faucet to the plumbing pipe. Most people use the push-fit style for connection because it has the most straightforward installation. It doesn’t require the soldering of the two pipes and the link works with any water pipe.
You can opt for a standard threaded type when you cannot find a frost-proof with push-fit connector. Use a female threaded-to-push-fit transition fitting to connect it to the pipe. We remind you that there are frost-free faucets that come with PEX connectors–they’re excellent when you already have PEX tubing in your home.
With modern outdoor faucets, an anti-siphon valve (vacuum breakers in the spigots) are mandatory by all building codes. Anti-siphon valves are built-in new sill cocks, or you can add them. It stops unsanitary water from getting back in the garden hose and contaminates the house’s water. If you add an anti-siphon valve, make sure not to apply pipe compound or tape on the sill cock out threads.
How to install a frost-proof spigot?
Whether you have copper pipes, metal pipes, or any pipes, you can take the same steps to replace an outdoor faucet with a frost-proof model:
Shut off and drain the water
Start by turning off the water to the supply line that goes to the spigot. If the water pipe doesn’t come with a control valve, you have to turn off the water to the house. Use the main shut off valve for this step. Continue turning on the faucet and draining the remaining water from the supply line.
Disassemble the old faucet
Remove the mounting screws and unscrew the spout from the pipe’s end clockwise. A pair of channel-lock pliers will be necessary to twist the faucet spout.
Take the measures for the new outdoor faucet
Go over the instruction for the frost-free faucet to measure; cut after you mark the water supply pipe. You have to measure from the exterior surface of the wall, where the faucet flange is located and go indoors along the pipe. You will stop where the faucet stem connects to the waterline. You will add an extra inch of length to insert the line into the fitting when using a push-fit plumbing fitting.
Manage the water supply pipe
Typically, the frost-proof faucet has a long valve stem, so you need to cut the water supply pipe where the faucet’s tube will connect to it. Various materials require various tools for cutting. You need a hacksaw for a PVC or galvanized steel pipe, a tubing cutter for a copper pipe, and a PEX tubing cutter if the line is PEX. Discard the cut-off section of the pipe outside the house.
Use emery cloth or sandpaper to debut the outside and inside of the cut end of the pipe. Seek that the pipe’s exterior is clean and smooth so that the attachment of the frost-proof faucet goes nice and smooth.
Most manufacturers recommend marking about 1 inch from the cut end of the pipe for the push-in distance. Use a tape measure for accurate measurements.
Connect the frost-proof faucet
Work from the outside to insert the new spigot through the wall and place the spout right side up. Move inside and push the fitting end right into the pipe; you need to push as far as the fitting allows you to. It should get to the mark on the pipe– it’s how you know it’s fully inserted into the fitting.
Should you use a standard threaded faucet, you have begun with screwing on the push-fit transition fitting to the tube. You need to do it before you attach it to the pipe. While you’re outside the house, use corrosion-resistant screws to secure the faucet flange to the wall surface. Typically, the screws come with the faucet.
Test the new water spigot
Always test your plumbing work before ending the job. Open the valve on the new faucet and turn the water on at the shutoff valve. Let the wat flow freely out of the new spigot. You need to make sure that everything works as planned by opening and closing the faucet spigot several times. See if there are any leaks where the spigot tube attaches to the water pipe.
If everything looks OK, you should end the job by sealing the joint between the house wall and the faucet flange. Use exterior caulk for the sealing.
Do you want to winterize a standard spigot?
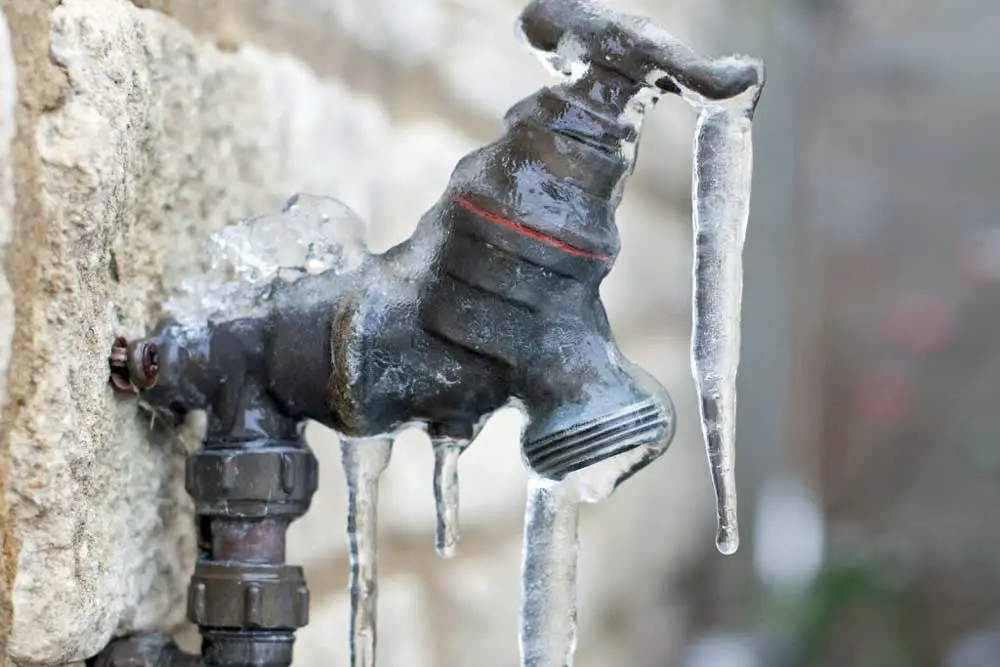
If buying and replacing the standard spigots with frost-proof ones seems like too much trouble for you, you should winterize the spigots before freezing temperatures kick in. We recommend you winterize the spigots to avoid the risk of bursting in the middle of the winter. The steps you will need to winterize the outdoor faucets are as follows:
Remove the hose
If your garden hose is still attached to the outdoor water faucet, you must remove it from the spigot. Get rid of all remaining water in the hose too. Place the hose in a dry location over the winter.
Turn off the water
Find the control valve on the water supply pipe to the outdoor faucet. A brass ball placed several feet from the outside wall is typical for metal water pipes. You need to turn the handle of the control valve clockwise. Turn the lever until it’s perpendicular to the pipe if the valve comes with a lever-kind handle.
extra tip
Houses should have shutoff valves on the supply line to the faucets. When the outdoor faucet doesn’t have one, it’s recommended you install one for effortless winterizing of the pipes.
Drain the spigot
You need to open the outdoor faucet completely and allow all left water to come out of the pipe. If the water doesn’t seem to stop, the indoor shutoff valve might be defective– replace it when you have the possibility. Continue with closing the spigot valve.
If applicable, place a bucket under the shutoff valve and put aside the bleeder cap on the valve. Use some pliers to loosen the cap and allow all left water in the line drain to collect in the bucket. Put the bleeder cap back on and seek that it’s tightly sealed.
Set up an insulated faucet cover
You can also add a faucet cover or an insulated faucet sock to the faucet. The covers cannot generate heat, but they collect some heat from the house. The heat is enough to reduce the risk of freezing and bursting the spigot. It will work, especially if you have followed all the previous recommendations.

