Smart Trane thermostats and controls are crucial to saving energy, adjusting humidity and temperature levels, locks and unlocking doors, turning on and off the lights, and even checking out your security cameras. You can do it away from home, on your tablet, computer, and most smartphones. The smart thermostats from Trane are a lot more than thermostats. They become the central hub for your house.
Trane provides you with several smart thermostat models that you can connect to your Wi-Fi network for remote control. You can find Trane thermostats with touchscreen control, a built-in Bridge for Z-Wave devices, etc. With a model with a built-in bridge for Z-wave devices, you will be able to monitor and control from a distance more than 200 smart home devices such as air quality monitors and fan switches. You can use it with the Trane Home app or through your voice through Google Home or Amazon Alexa-enabled devices.
Page Table of Contents
How to connect your Trane Thermostat to Wi-Fi
There are several methods to connect a Trane Thermostat to your Wi-Fi. You have to be at the thermostat’s location to connect it to Wi-Fi. It’s impossible to perform the task remotely from the web portal or the mobile app. Should you replace the router, change the network password, or switch to a new ISP, you will have to do the steps all over again to update the information on the Wi-Fi thermostat.
Here are some methods to use to connect the Trane thermostat to Wi-Fi:
1. Wi-fi connection
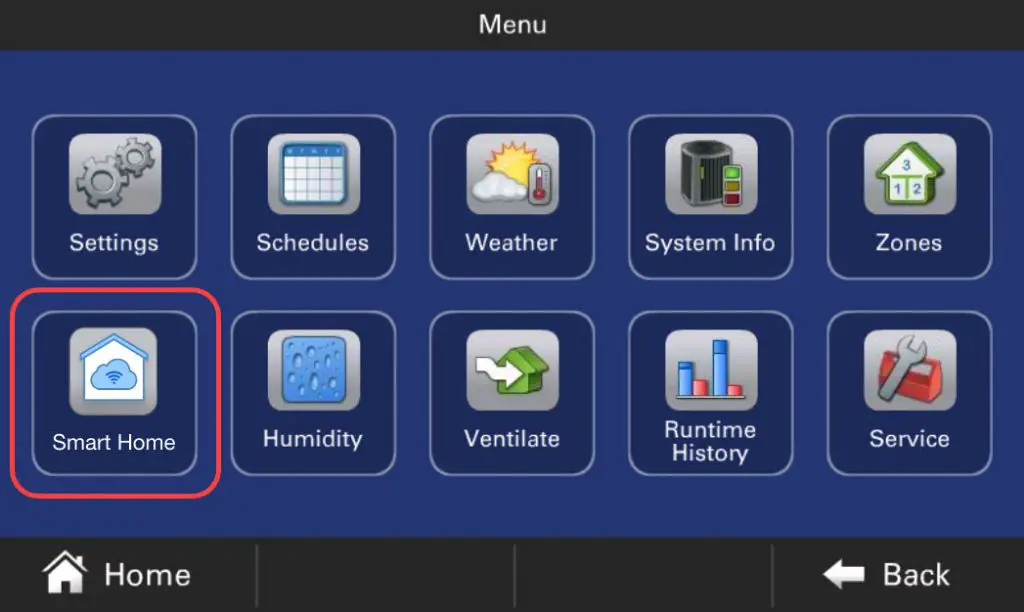
Tap MENU on your thermostat and press Settings. Continue with choosing Network and then pressing Connect to Wi-Fi Network. Select your Wi-Fi Network and enter the password. End by selecting Connect.
2. Wi-Fi connection using WPS
Choose the WPS button on the router and return to the control. Choose the Wi-Fi Protected Setup button on the Wireless Network Screen. Choose NEXT.
3. Wireless Wi-Fi connection using a “Hidden network”
If you have a hidden network, pick “Hidden Network.” You will find it at the end of the list of available networks. Sometimes, there are many networks, so you will have to scroll to the next page until you find the Hidden Network.
Continue with entering the SSID (it’s the router’s name) and select NEXT. Continue with choosing the security type for the network. If you pick None, choose Connect.
If you choose WPA or WEP, you will have to enter a password and only afterward can you Connect.
Important notes
- If your thermostat has an Ethernet jack (some Trane models have), you can connect it to the router with a CAT5 cable. The control will identify the Ethernet connection and the User Wizard will skip the Wireless setup screens. Instead, it will directly display the Trane Home Registration screen.
- Passwords are case-sensitive and you must enter them the same way you set them on the router. If the thermostat successfully connects, you will see a message on the touch screen. If the password you entered is incorrect, you will not see the message. Therefore, the thermostat won’t connect. You will need to press home to return to the thermostat screen and repeat the steps for proper connection.


